SODAQ
Connect Anything Anywhere

0. Introduction
SODAQ stands for Solar Data Acquisition and is an Arduino compatible board with additional features.
The SODAQ comes with a temperature sensor, real-time clock, flash memory, bee socket and connectors for lipo battery and solar cell.
It is fitted with grove connectors allowing for projects to be as easy as clicking together lego-like building blocks. The SODAQ board is designed to be able to communicate from anywhere with the different bee style modules.With all the features of SODAQ it’s possible to take you projects beyond your home and garden.

1. Flash memory (AT45DB161E)
2. Microcontroller (ATmega328P)
3. FTDI chip (FT232RL)
4. Real-time clock (DS3231)
1. Switching the board on
The only switch on the SODAQ board is an on/off switch. In off state the solar charge circuit is still active and the real-time clock is still powered.
Make sure that also when programming the board the switch is in the ON position.
Next to the switch there is a two pin header for an external on/off switch. If you want to use the external on/off switch make sure the SODAQ board switch is in off state.
2. Programming the SODAQ board
Windows 7 and 8 normally find the right USB driver when you plug in the SODAQ for the first time. The same is true for Mac and Linux.If your system doesn’t find the driver you will have to download the FTDI from:
www.ftdichip.com/drivers/vcp.htm
The FTDI driver adds a communication port. In Windows this is COMx (so COM1, COM 8, etc.).
On Linux and Mac the port name starts with /dev/tty..
The SODAQ board can be programmed with the Arduino IDE.
The latest version of Arduino IDE can be found at www.arduino.cc.
The SODAQ board is tested with Arduino IDE version 1.0.5.
Before you can program the SODAQ you have to select the right board and port settings.
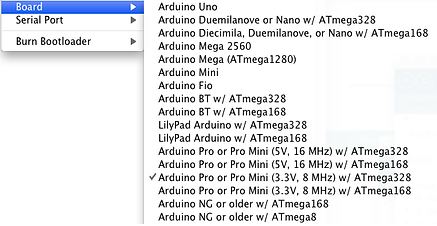
You can select the board by going to
Tools > Board > Arduino Pro or Pro Mini(3.3V, 8 MHz)w/ATmega328.
Next make sure you select the right serial port:
In Arduino IDE you can begin with a simple sketch like LED blink.
Go to File > Examples > 01.Basics > Blink.
This sketch needs to be modified, because the SODAQ board doesn’t have a LED on pin 13, but has a LED on pin 6 instead.
Pin 6 is normally used for switching power to the Switched row of Grove connectors, but for now we just use it because it has an LED too.
Now if you look at the first line that has colored text (Should be line 10 if you load the example) you see “int led = 13;”.
Change the number ‘13’ to ‘6’ and upload the sketch to the SODAQ board using the right settings mentioned above. (or just copy the code below:)
int led = 6;
void setup() {
pinMode(led, OUTPUT);
}
void loop() {
digitalWrite(led, HIGH);
delay(1000);
digitalWrite(led, LOW);
delay(1000);
}
When programming the SODAQ board, always make sure that there is no bee module in the bee slot.
If a bee module is plugged in while programming the SODAQ board it may cause the programming to fail.
This is because USB connector and the bee module are using the same connections for communication.
3. Grove sockets
The SODAQ board has two rows of grove connectors. They both contain the same I/O pins but one row can be turned on/off in software.
The switched row can be used to reduce the energy consumption of some sensors.
Make sure the maximum current of all sensors in the switched row is not greater then 115 mA.
The switching of this row is done by actually switching the ground connection on/off.
Therefore if you are using the switched row with a cable, make sure you are not using any other ground connection then this cable.
Otherwise the switching will not have effect and the attached device will always be powered.
Click Here for tutorials on the use of the Grove system.
4. Real-time clock (RTC) DS3231
The real-time clock is connected with the I2C lines of the ATmega328p. The RTC keeps information about seconds, minutes, hours, day, date, month and year.But this chip can also measure temperature with a ±3°C accuracy.
4.1. Setting up DS3231 in arduino project
To be able to work with the DS3231 in your arduino project you need to include the following libraries:
Wire.h
Sodaq_DS3231.h
The code to run in the arduino setup function:
Wire.begin();
rtc.begin();
Now you are ready to start using the DS3231 in your code.
4.2. Reading time from the DS3231
To be able to get data from the RTC you have to something like this:
now = rtc.now();
uint32_t ts = now.getEpoch();
The epoch timestamp is a 4bits timestamp. But that isn’t the only thing you can get from it, you are also able to ask each separate item with its own function:
char weekDay[][4] = {"Sun", "Mon", "Tue", "Wed", "Thu", "Fri", "Sat" };
Serial.print(now.year(), DEC);
Serial.print('/');
Serial.print(now.month(), DEC);
Serial.print('/');
Serial.print(now.date(), DEC);
Serial.print(' ');
Serial.print(now.hour(), DEC);
Serial.print(':');
Serial.print(now.minute(), DEC);
Serial.print(':');
Serial.print(now.second(), DEC);
Serial.print(' ');
Serial.print(weekDay[now.dayOfWeek());
Here is a function that is handy to be able to set up the RTC
void adjustDate(int year, int month, int date, int hour, int min, int sec, int weekday){
DateTime dt(year, month, date, hour, min, sec, weekday);
rtc.setDateTime(dt); //Adjust date-time as defined 'dt' above
//Serial.println(rtc.now().getEpoch()); //debug info
}
4.3. Reading from the temp sensor
To read data from the temp sensor you need to use the following code:
rtc.convertTemperature(); //convert current temperature into registers
float tempFloat = rtc.getTemperature(); //read registers and display the temperature


Windows Mac Linux
